This is what you need to get this done.
- 1 Replay board Flashed with ARM FW 20170615+ and recent a Amiga core w/ 3.0+ ROM.
- 1 SDCARD of reasonable size – I used an 8GB SanDisk SDHC Class 10 card for this.
- Workbench 3.0/3.1 in .ADF format
- P96 installation from http://classicwb.abime.net/
- AddReplayMem command, Picasso96 RTG and AHI driver from this forum / the repository (strictly speaking optional, but.. 😉
- FAT95 from Aminet (optional, but the version from ClassicWB is a bit older it seems)
This can be done completely without using WinUAE, but it might be faster to do it on your host PC.
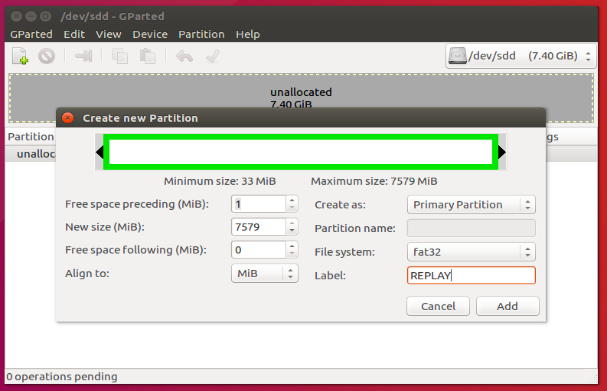
1. Prep and format the SDCARD with MBR (not GPT/GUID) and an _aligned_ FAT32 partition.
On a Mac you can prepare your card like this:
1. Insert the SDCARD
2. Open Terminal.app
3. > $ mount
This should give you something similiar to this output:
/dev/disk1s1 on / (apfs, local, journaled)
devfs on /dev (devfs, local, nobrowse)
/dev/disk1s4 on /private/var/vm (apfs, local, noexec, journaled, noatime, nobrowse)
map -hosts on /net (autofs, nosuid, automounted, nobrowse)
map auto_home on /home (autofs, automounted, nobrowse)
/dev/disk2s1 on /Volumes/NAME_OF_YOUR_CARD (msdos, local, nodev, nosuid, noowners)
4. Notice this line:
/dev/disk2s1 on /Volumes/NAME_OF_YOUR_CARD (msdos, local, nodev, nosuid, noowners)
Now find the equivalent line for your SDCARD.
5. cp -r /Volumes/NAME_OF_YOUR_CARD ~/SDCARD_BACKUP (replace NAME_OF_YOUR_CARD with whatever your card is named)
6. double check you got everything diff -r /Volumes/NAME_OF_YOUR_CARD ~/SDCARD_BACKUP
7. copy the device path from step 3 (in my case /dev/disk2s1) and remove the ending (s1), and change disk to rdisk new full path /dev/rdisk2
8. Run sudo diskutil unmountDisk /dev/rdisk2 (where /dev/rdisk2 is whatever you had in step 7)
9. Run sudo dd if=/dev/zero of=/dev/rdisk2 bs=8192 count=16 (where /dev/rdisk2 is whatever you have from step 7)
This should give you an output similiar to this if you are successful:
Johans-MacBook-Air-2:~ spot$ sudo dd if=/dev/zero of=/dev/rdisk4 bs=8192 count=16
16+0 records in
16+0 records out
131072 bytes transferred in 0.027265 secs (4807323 bytes/sec)
10. Eject and then reinsert the sdcard.
11. Be presented with the dialog saying The disk you inserted was not readable by this computer, and press Initialize
12. In Disk Utility, under External, select Generic STORAGE
13. Press Erase
14. Change Format: to MS-DOS (FAT) and Scheme: to Master Boot Record
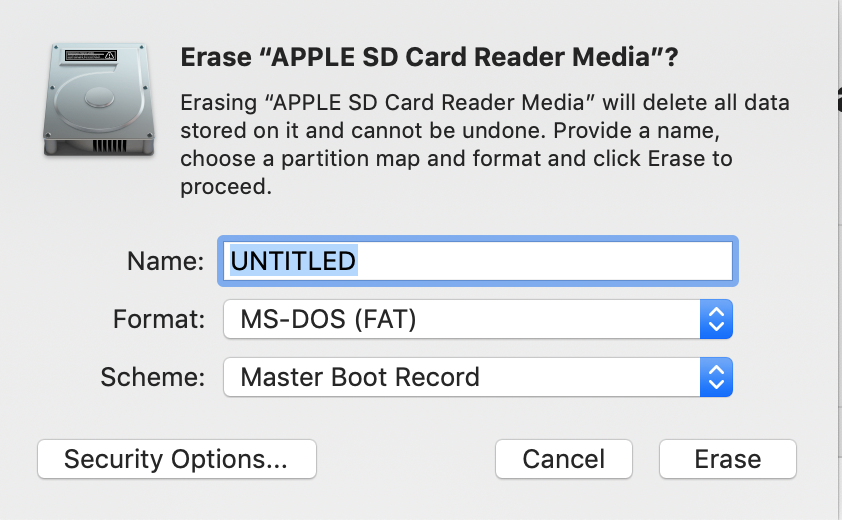
15. Press Erase
16. Restore the contents of the SDCARD cp -r ~/SDCARD_BACKUP/* /Volumes/NAME_OF_YOUR_CARD/
This might show differences wrt Spotlight or similar. That’s fine. ex
diff: /Volumes/UNTITLED/.Spotlight-V100: Operation not permitted
diff -ru /Volumes/UNTITLED/.fseventsd/fseventsd-uuid /Users/erik/SDCARD_BACKUP/.fseventsd/fseventsd-uuid
— /Volumes/UNTITLED/.fseventsd/fseventsd-uuid 2019-12-09 21:49:54.000000000 +0100
+++ /Users/erik/SDCARD_BACKUP/.fseventsd/fseventsd-uuid 2019-12-09 21:32:33.000000000 +0100
@@ -1 +1 @@
-E3124F92-732F-4F68-9EF0-3564F626F084
\ No newline at end of file
+F041701C-467A-4FCA-9E7D-B4D38C2DFC12
\ No newline at end of file
2. Copy the latest replay_amiga.bit + replay.ini and Kickstart ROM to the root of the SDCARD
Edit the replay.ini and make sure it’s using 68020, XRAM, P96 etc is all enabled and that the ROM=<filename> matches the filename of the ROM.
Then double check that the replay can boot the SDCARD.
3. Continue to copy the Workbench .ADFs, the ClassicWB P96 System.hdf and all the Replay+Aminet drivers/tools to the root of the SDCARD.
Edit the replay.ini and add
chb_mount = “?mmc”,1
at the end (make sure no other ‘chb_mount’ lines are active). This will attach the ClassicWB image as master and the whole SDCARD as slave.
4. Insert the SDCARD in the Replay and boot. Follow the on-screen instructions how to activate using the WB ADFs.
5. Assuming everything went OK we now have ClassicWB booting up (but complaining about ‘uaegfx’),
just go ahead and remove uaegfx from DEVS:Monitors/.
6. Now you can go ahead and install the AddReplayMem and RTG driver, if you got them in .ADF format. Otherwise hold on.
7. Open a Shell and run:
3.System:> Stack 131072
3.System:> GiggleDisk scsi.device 1 prefix FAT mountdos
You should get this output:
GiggleDisk (c)2005 Guido Mersmann
0, DosType: 46415401, LowCyl: 2048 HighCyl: 15521792, Size: 7 GB, FileSystem: L:fat95
Mounting ‘FAT0:’
8. If you wish you can now update FAT95 with the latest version and/or install the Replay additions.
9.Take some time and browse the FAT0: – It should ‘just work ™’.
10. If everything looks fine then open a Shell and run
This will write the FAT0: partition setup to the RDB (starting with the second block of the SDCARD, leaving the MBR (at block 0) intact).
11. Confirm that the RDB was written correctly by rebooting into the Amiga Early Startup Control, and inspect the Boot Options.
Attempting to boot from FAT0: at this point will get you nowhere – we need to copy the whole System.hdf to FAT0:
12. Boot to Workbench again, and start DirectoryOpus. Select the entire content of SYS: and copy it to FAT0: (this will probably take a while)
13. Reboot into the Amiga Early Startup Control, and choose to boot from FAT0:
14. Launch whatever text editor is available from Workbench and open FAT0:REPLAY.INI
Change the HDD mounts to:
#chb_mount = “System.hdf”,0
Save and either reload the replay.ini or power-cycle the Replay board. Simply rebooting the Amiga will not suffice.